HTX FAQ

Account
Why Can’t I Receive Emails from HTX?
If you are not receiving emails sent from HTX, please follow the instructions below to check your email’s settings:-
Are you logged in to the email address registered to your HTX account? Sometimes you might be logged out of your email on your device and hence can’t see HTX emails. Please log in and refresh.
-
Have you checked the spam folder of your email? If you find that your email service provider is pushing HTX emails into your spam folder, you can mark them as “safe” by whitelisting HTX email addresses. You can refer to How to Whitelist HTX Emails to set it up.
-
Is the functionality of your email client or service provider normal? To be sure that your firewall or antivirus program isn’t causing a security conflict, you can verify the email server settings.
-
Is your inbox packed with emails? You won’t be able to send or receive emails if you have reached the limit. To make room for new emails, you can remove some of the older ones.
-
Register using common email addresses like Gmail, Outlook, etc., if at all possible.
How come I can’t get SMS verification codes?
HTX is always working to improve the user experience by expanding our SMS Authentication coverage. Nonetheless, certain nations and regions aren’t currently supported.Please check our global SMS coverage list to see if your location is covered if you are unable to enable SMS authentication. Please use Google Authentication as your primary two-factor authentication if your location is not included on the list.
The following actions should be taken if you are still unable to receive SMS codes even after you have activated SMS authentication or if you are currently living in a nation or region covered by our global SMS coverage list:
- Make sure there is a strong network signal on your mobile device.
- Disable any call blocking, firewall, anti-virus, and/or caller programs on your phone that might be preventing our SMS Code number from working.
- Turn your phone back on.
- Instead, try voice verification.
How to Change My Email Account on HTX?
1. Go to the HTX website and click on the profile icon.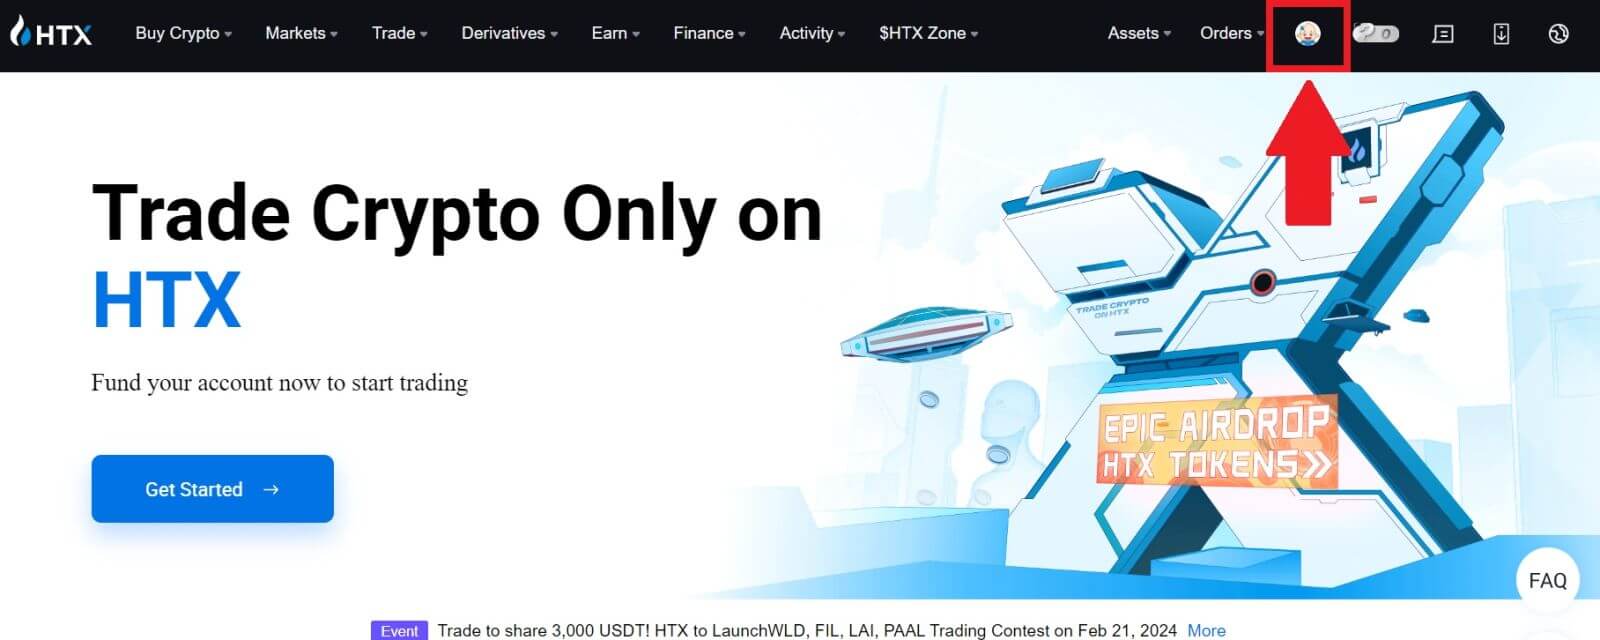
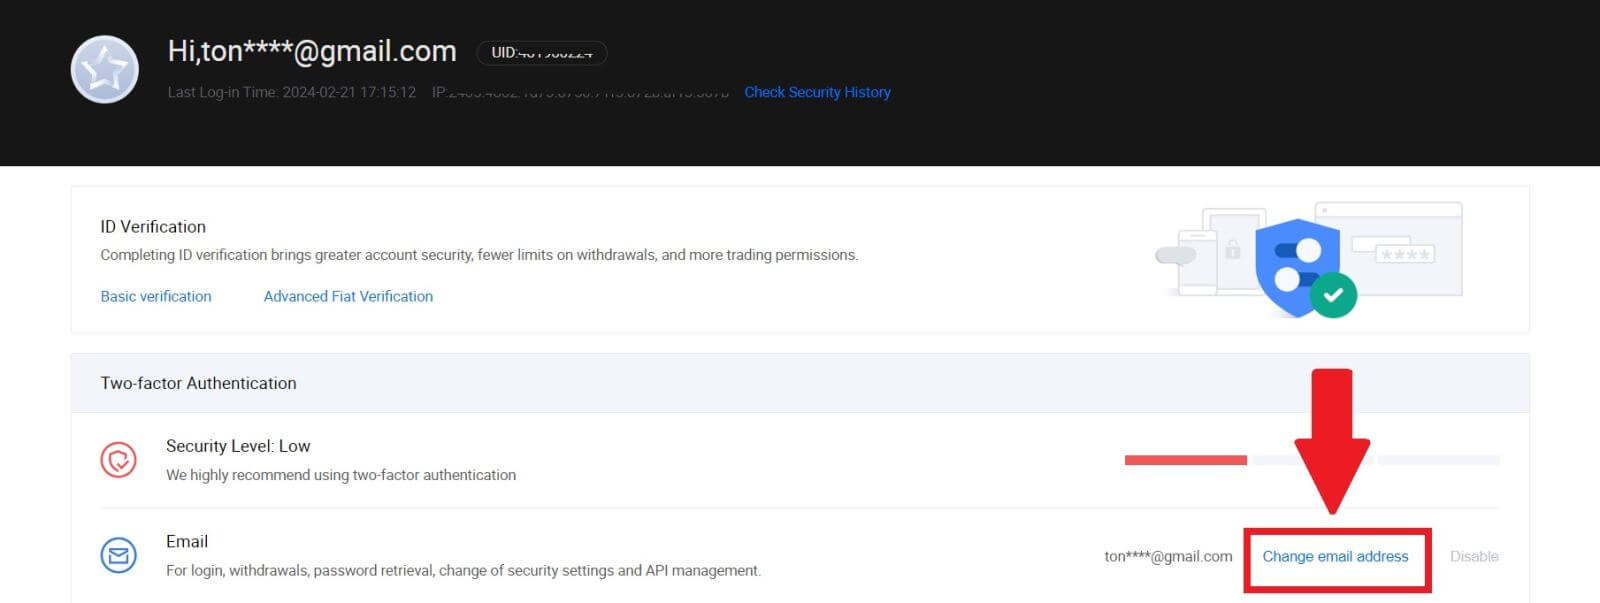
2. On the email section, click on [Change email address].
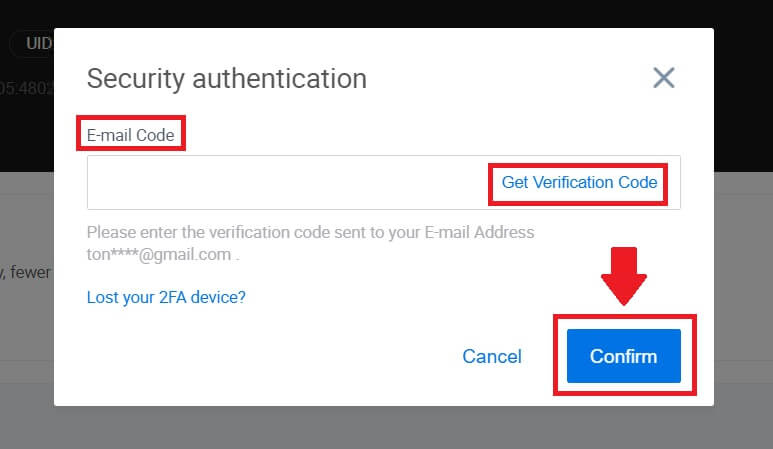
3. Enter your email verification code by clicking on [Get Verification]. Then click [Confirm] to continue.
4. Enter your new email and your new email verification code and click [Confirm]. After that, you have successfully changed your email.
Note:
- After changing your email address, you will need to log in again.
- For your account security, withdrawals will be temporarily suspended for 24 hours after changing your email address

What is Two-Factor Authentication?
Two-Factor Authentication (2FA) is an additional security layer to email verification and your account password. With 2FA enabled, you will have to provide the 2FA code when performing certain actions on the HTX platform.
How does TOTP work?
HTX uses a Time-based One-time Password (TOTP) for Two-Factor Authentication, it involves generating a temporary, unique one-time 6-digit code* that is only valid for 30 seconds. You will need to enter this code to perform actions that affect your assets or personal information on the platform.
*Please keep in mind that the code should consist of numbers only.
How to Link Google Authenticator (2FA)?
1. Go to the HTX website and click on the profile icon.

2. Scroll down to the Google Authenticator section and click on [Link].

3. You need to download the Google Authenticator app to your phone.
A pop-up window will appear containing your Google Authenticator Backup Key. Scan the QR code with your Google Authenticator App.

How to add your HTX account to the Google Authenticator App?
Open your Google authenticator app. On the first page, select [Add a code] and tap [Scan a QR code] or [Enter a setup key].

 4. After successfully added your GA, enter your Google Authenticator 6-digits code and click on [Submit].

5. Enter your verification email code by clicking on [Get Verification Code].
After that, click [Confirm] and you have successfully enabled your 2FA in your account.

Verification
How to complete Identity Verification on HTX? A step-by-step guide (Web)
L1 Basic Permissions Verification on HTX
1. Go to the HTX website and click on the profile icon.

2. Click on [Basic verification] to continue.

3. On the Personal Verification section, click on [Verify Now].

4. On the L1 Basic Permission section, click on [Verify Now] to continue.

5. Fill out all the information below and click [Submit].

6. After submitting the information you have filled in, you have completed your L1 permissions verification.

L2 Basic Permissions Verification on HTX
1. Go to the HTX website and click on the profile icon.

2. Click on [Basic verification] to continue.

3. On the Personal Verification section, click on [Verify Now].

4. On the L2 Basic Permission section, click on [Verify Now] to continue.
Note: You need to complete the L1 Verification to continue the L2 verification.

5. Select your document type and your document issuing country.
Begin by taking a photo of your document. Following that, upload clear images of both the front and back of your ID into the designated boxes. Once both pictures are distinctly visible in the assigned boxes, click [Submit] to proceed.

6. After that, wait for the HTX team to review, and you have completed your L2 permissions verification.

L3 Advanced Permission Verification on HTX
1. Go to the HTX website and click on the profile icon.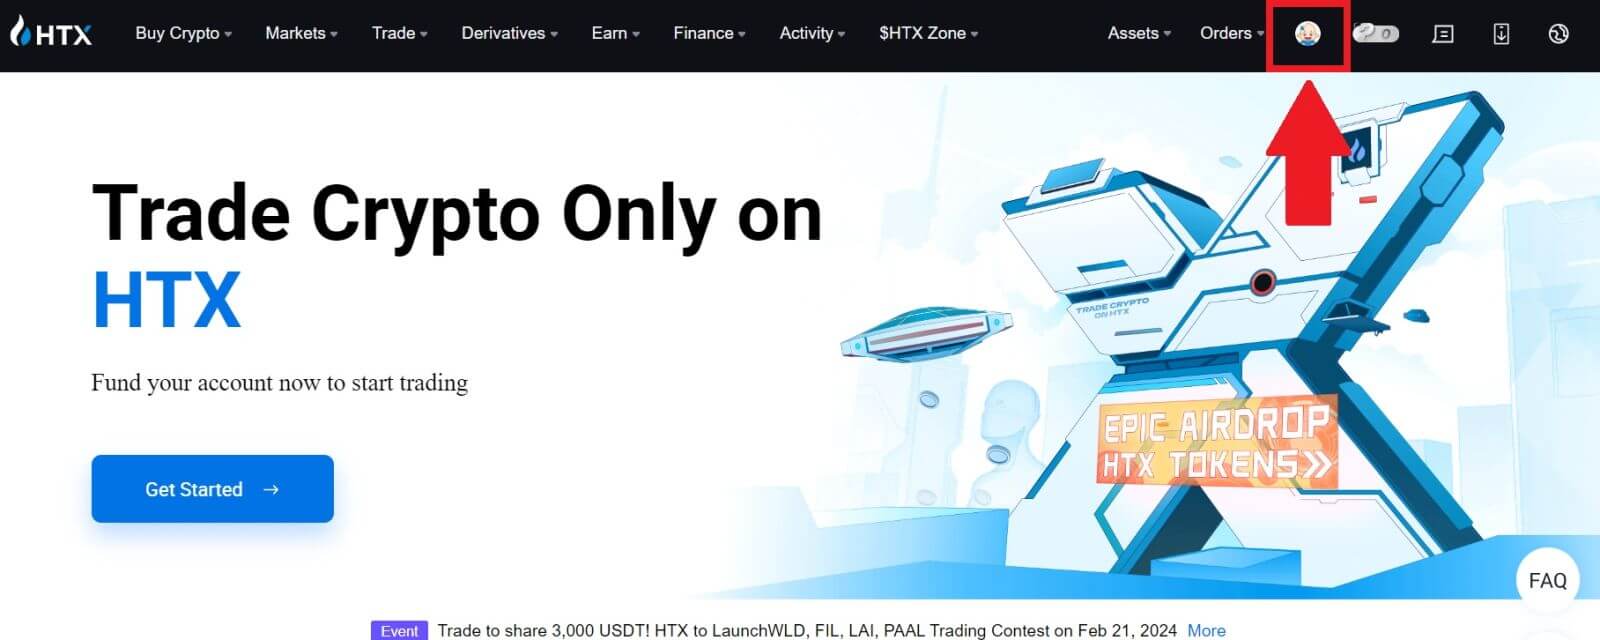
2. Click on [Basic verification] to continue.

3. On the Personal Verification section, click on [Verify Now].
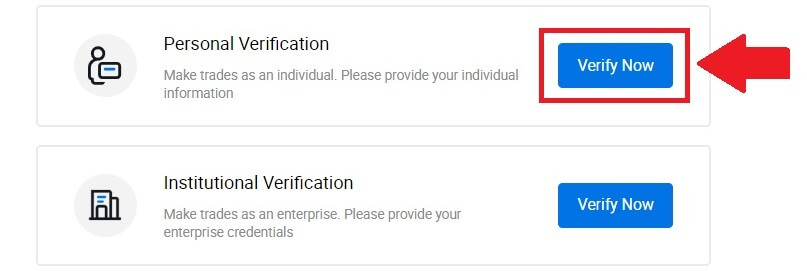
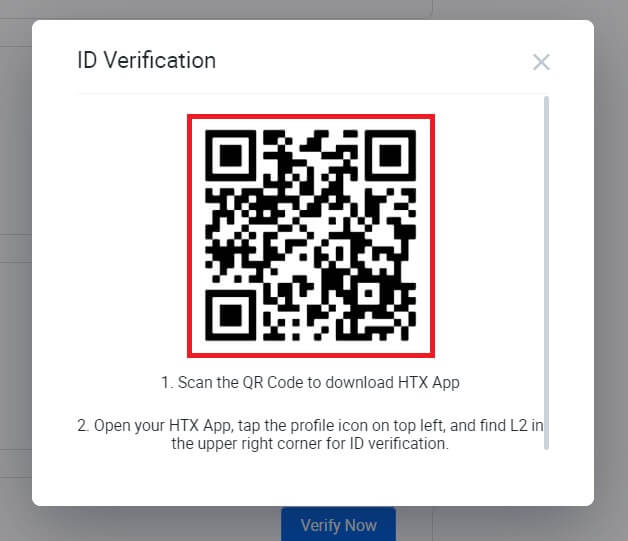
4. On the L3 Advanced Permission section, click on [Verify Now] to continue.
 5. For this L3 verification, you need to download and open the HTX app on your phone to continue.
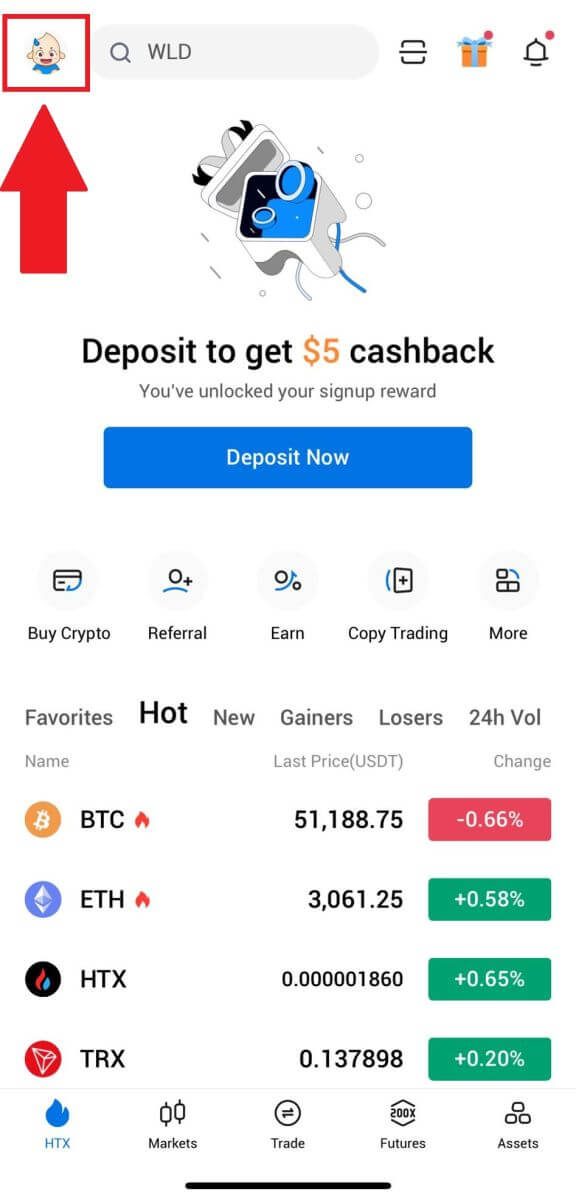
6. Log in to your HTX App, tap on the profile icon on the top left, and tap on [L2] for ID Verification.
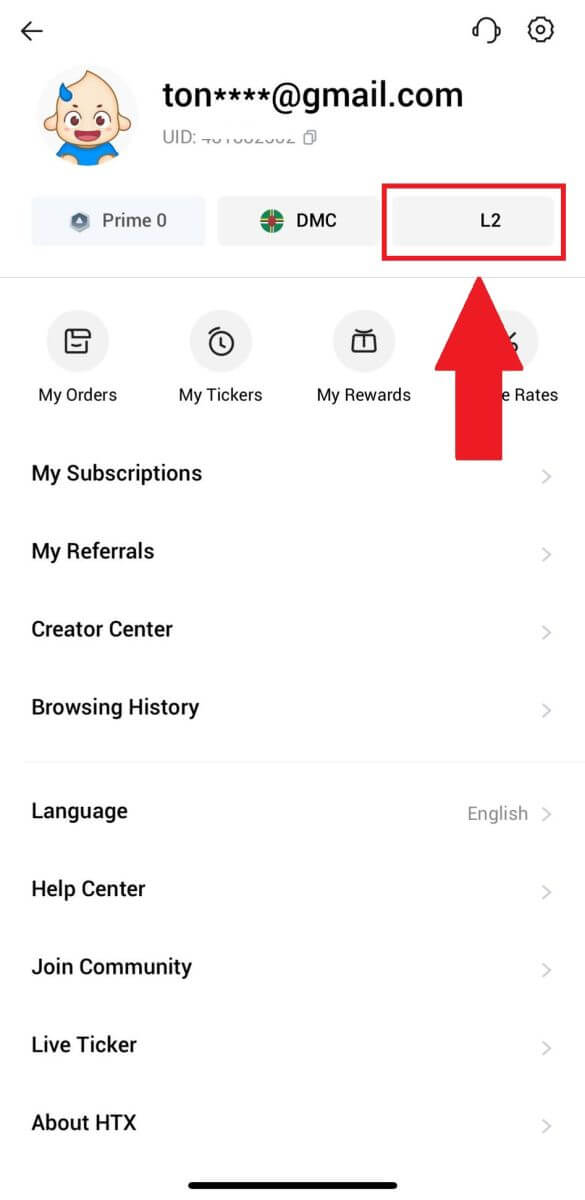
7. On the L3 Verification section, tap [Verify].
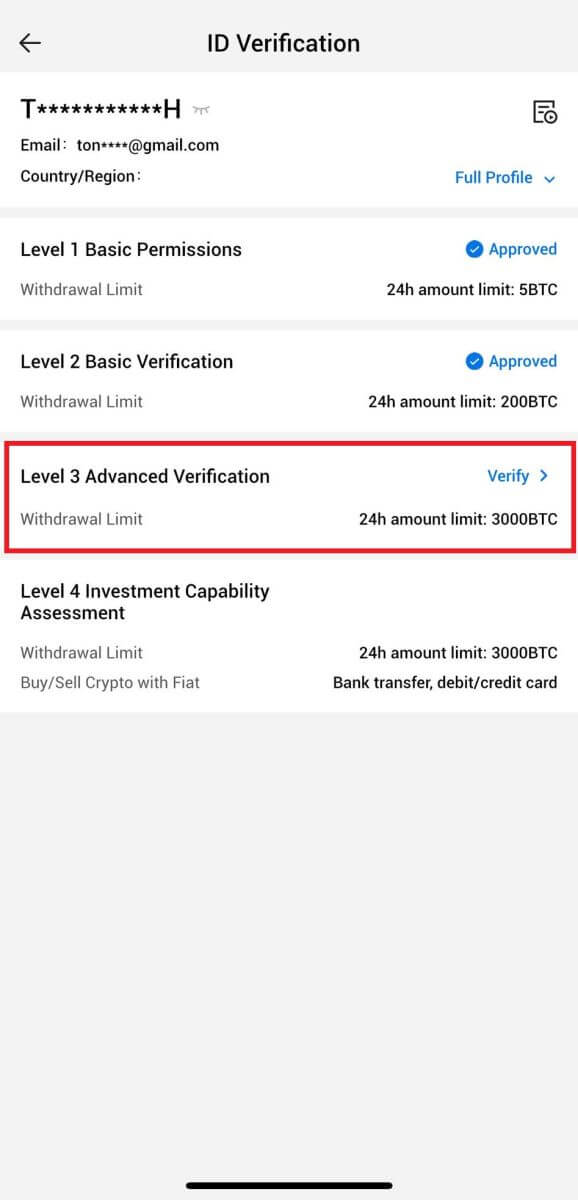
8. Complete the facial recognition to continue the process.
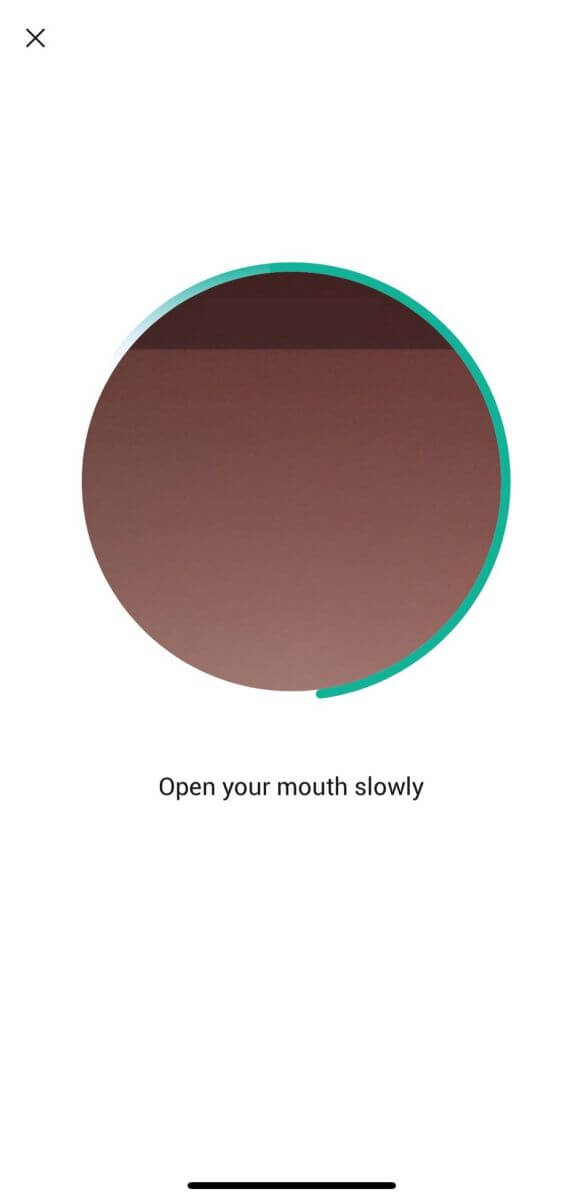
9. The level 3 verification will be successful after your application is approved.

L4 Investment Capability Assessment Verification on HTX
1. Go to the HTX website and click on the profile icon.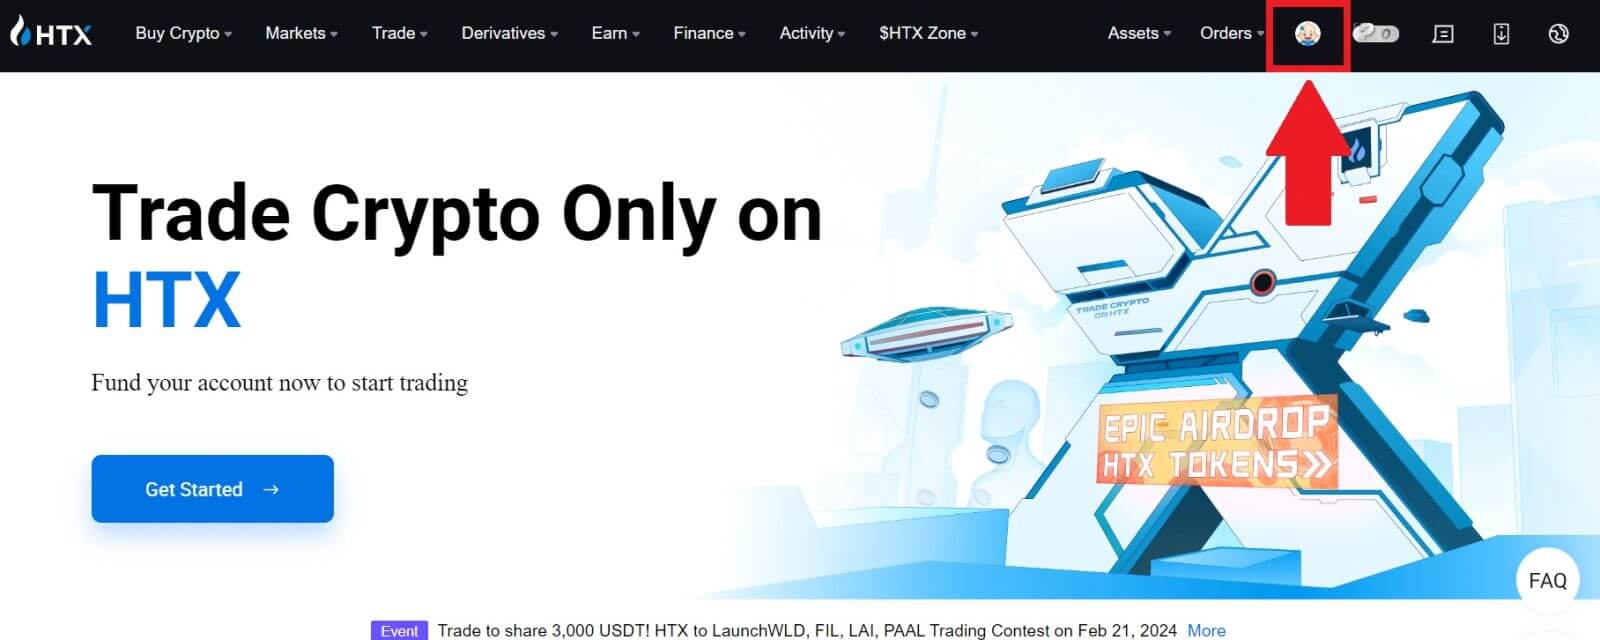
2. Click on [Basic verification] to continue.

3. On the Personal Verification section, click on [Verify Now].
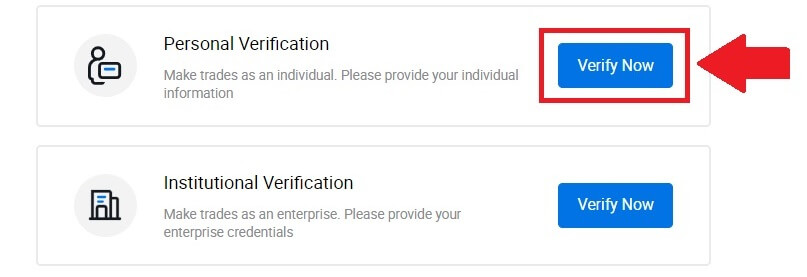
4. On the L4 section, click on [Verify Now] to continue.

5. Refer to the following requirements and all supported documents, fill out the information below and click [Submit].
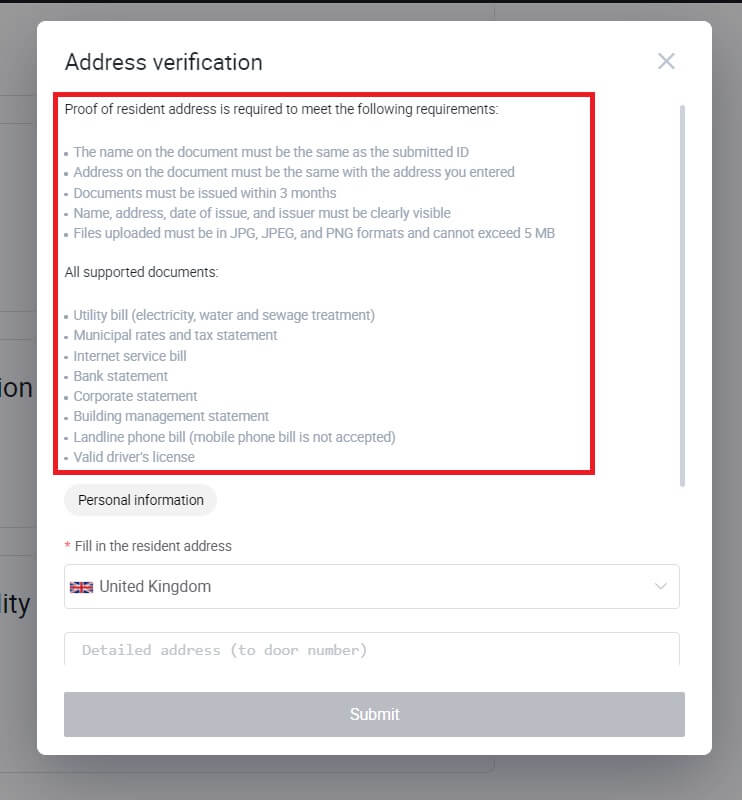
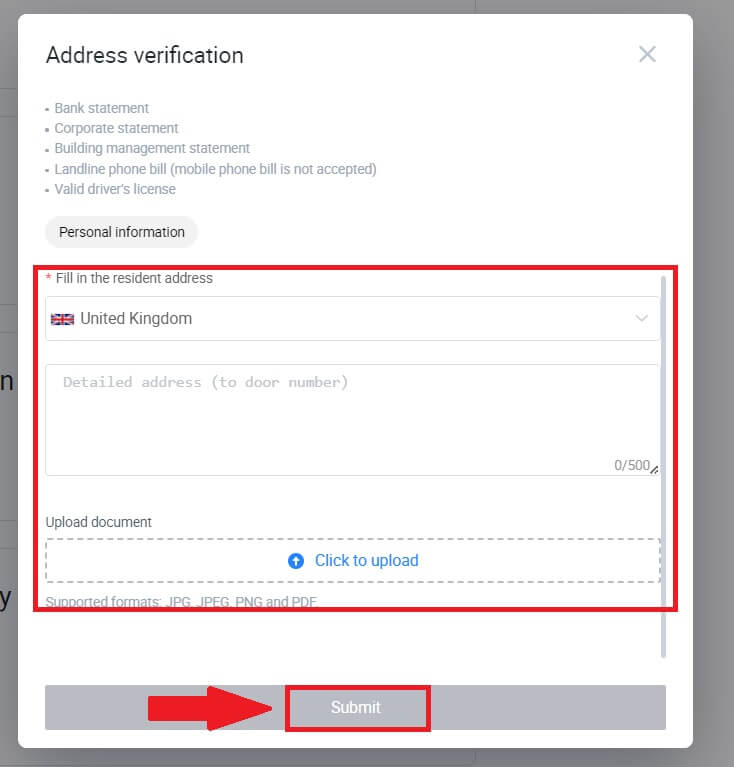
6. After that, you have successfully completed the L4 Investment Capability Assessment.

How to complete Identity Verification on HTX? A step-by-step guide (App)
L1 Basic Permissions Verification on HTX
1. Log in to your HTX App, tap on the profile icon on the top left.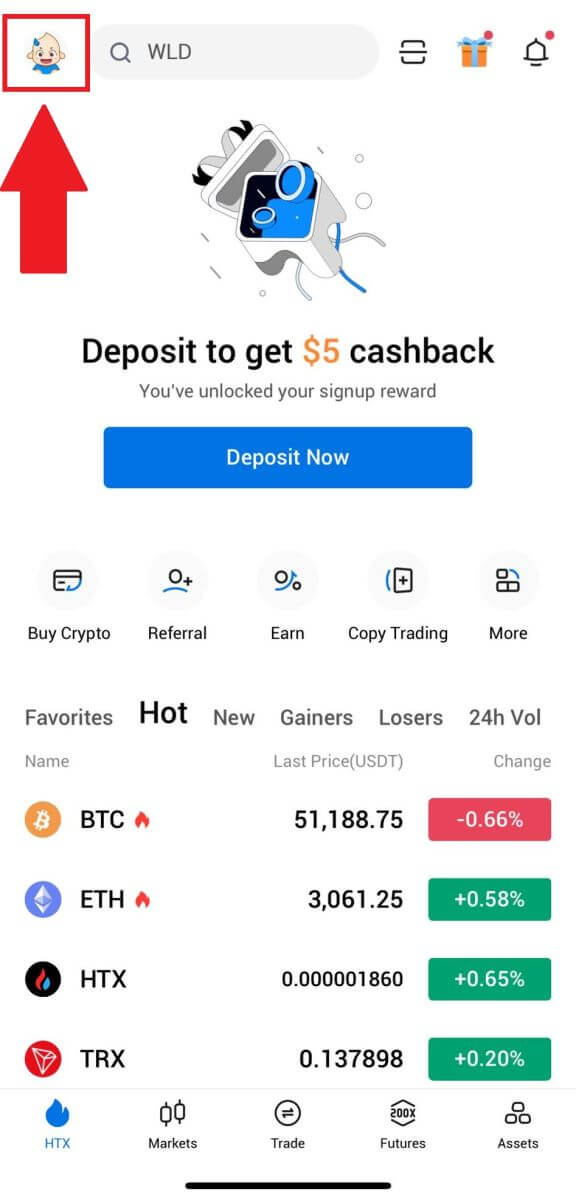
2. Tap on [Unverified] to continue.
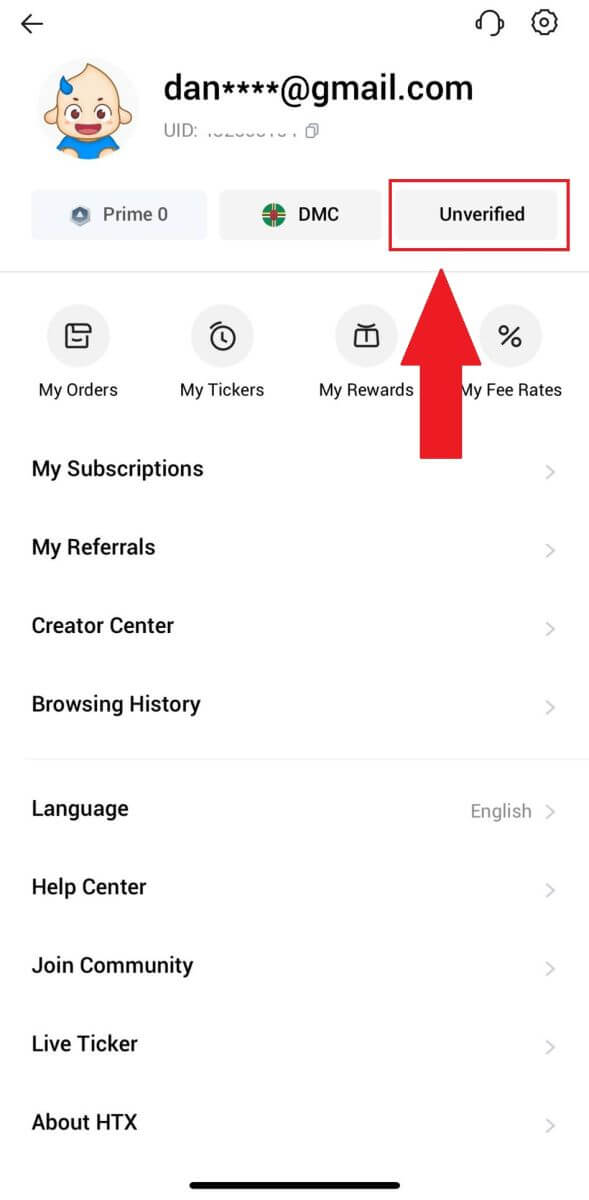
3. On the Level 1 Basic Permission section, tap [Verify].
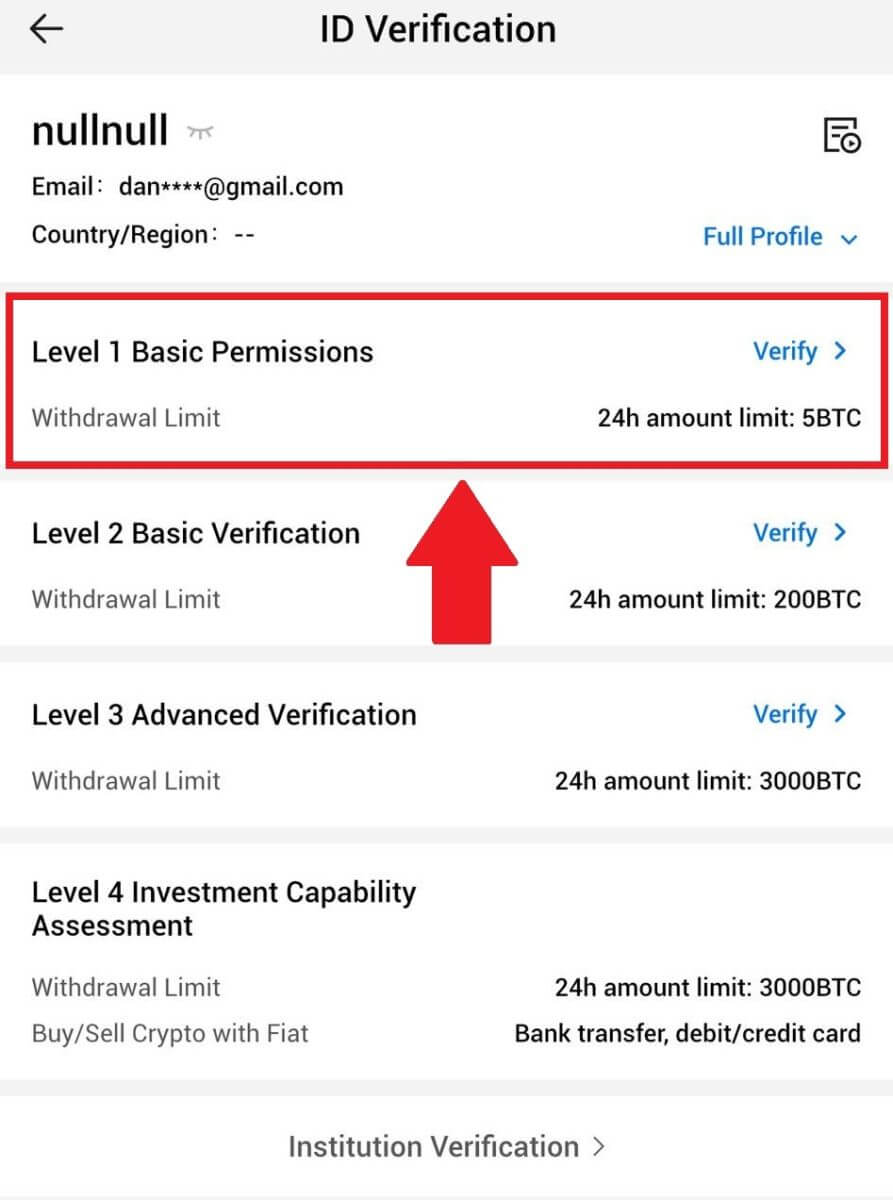
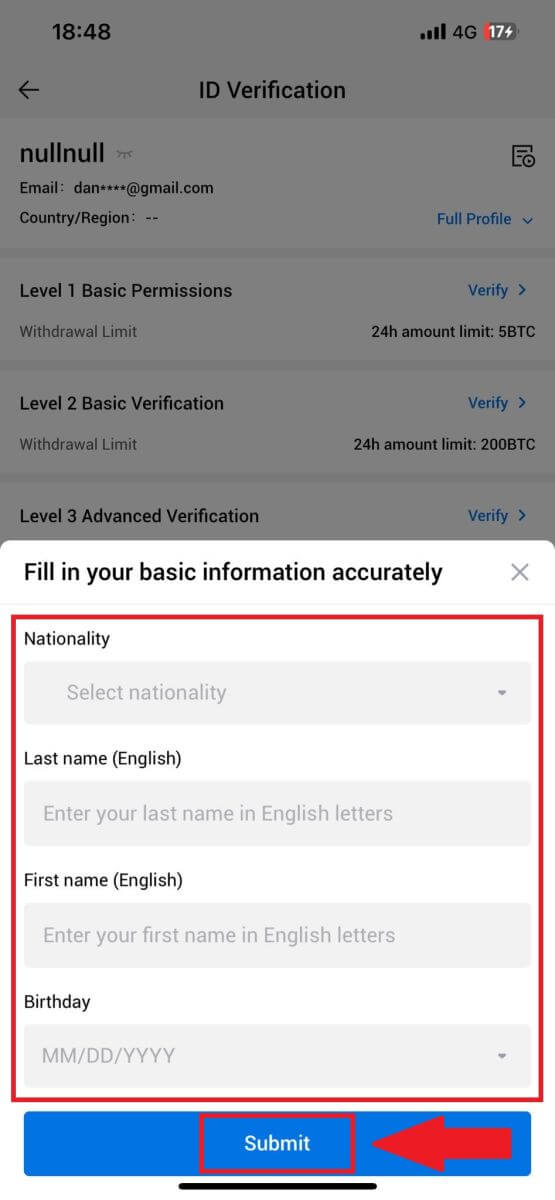
4. Fill out all the information below and tap [Submit].
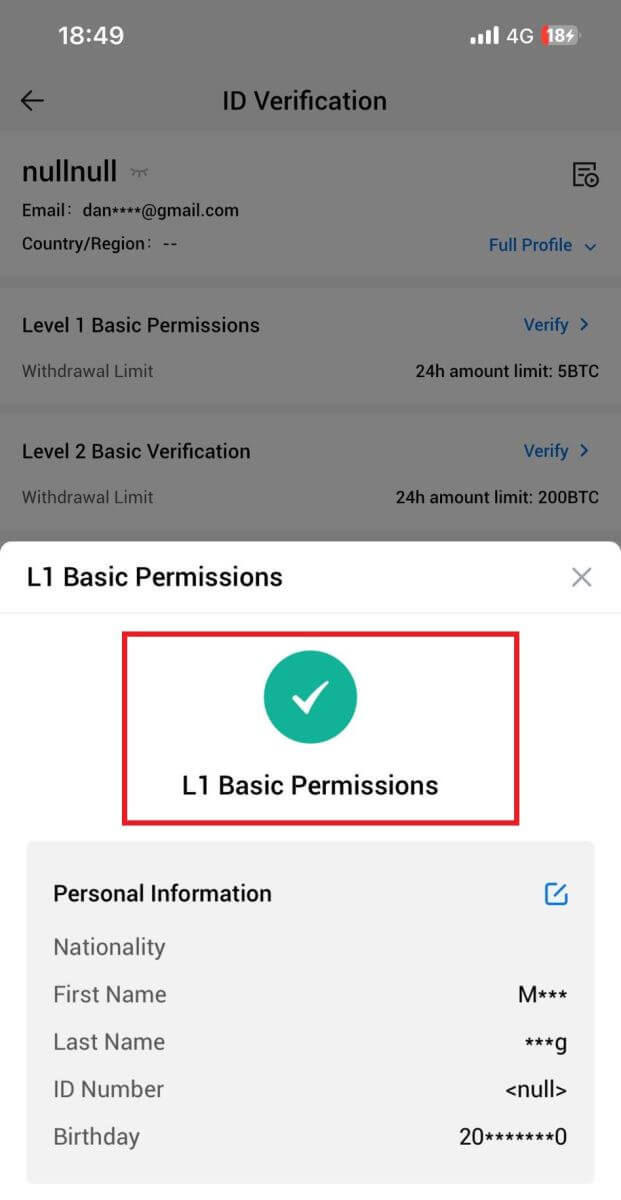
5. After submitting the information you have filled in, you have completed your L1 permissions verification.
L2 Basic Permissions Verification on HTX
1. Log in to your HTX App, tap on the profile icon on the top left.

2. Tap on [Unverified] to continue.

3. On the Level 2 Basic Permission section, tap [Verify].

4. Select your document type and your document issuing country. Then tap [Next].

5. Begin by taking a photo of your document. Following that, upload clear images of both the front and back of your ID into the designated boxes. Once both pictures are distinctly visible in the assigned boxes, tap [Submit] to proceed.

6. After that, wait for the HTX team to review, and you have completed your L2 permissions verification.

L3 Advanced Permissions Verification on HTX
1. Log in to your HTX App, tap on the profile icon on the top left.

2. Tap on [L2] to continue.

3. On the L3 Verification section, tap [Verify].

4. Complete the facial recognition to continue the process.
5. The level 3 verification will be successful after your application is approved.

L4 Investment Capability Assessment Verification on HTX
1. Log in to your HTX App, tap on the profile icon on the top left.

2. Tap on [L3] to continue.

3. On the L4 Investment Capability Assessment section, tap [Verify].

4. Refer to the following requirements and all supported documents, fill out the information below and tap [Submit].

 5. After that, you have successfully completed the L4 Investment Capability Assessment.

Unable to upload photo during KYC Verification
If you encounter difficulties uploading photos or receive an error message during your KYC process, please consider the following verification points:- Ensure the image format is either JPG, JPEG, or PNG.
- Confirm that the image size is below 5 MB.
- Use a valid and original ID, such as a personal ID, driver’s license, or passport.
- Your valid ID must belong to a citizen of a country that allows unrestricted trading, as outlined in "II. Know-Your-Customer and Anti-Money-Laundering Policy" - "Trade Supervision" in the HTX User Agreement.
- If your submission meets all the above criteria but KYC verification remains incomplete, it might be due to a temporary network issue. Please follow these steps for resolution:
- Wait for some time before resubmitting the application.
- Clear the cache in your browser and terminal.
- Submit the application through the website or app.
- Try using different browsers for the submission.
- Ensure your app is updated to the latest version.
Why can’t I receive the email verification code?
Please check and try again as follows:
- Check the blocked mail spam and trash;
- Add the HTX notification email address ([email protected]) to the email whitelist so that you can receive the email verification code;
- Wait for 15 minutes and try.
Common Errors During the KYC Process
- Taking unclear, blurry, or incomplete photos may result in unsuccessful KYC verification. When performing face recognition, please remove your hat (if applicable) and face the camera directly.
- KYC process is connected to a third-party public security database, and the system conducts automatic verification, which cannot be manually overridden. If you have special circumstances, such as changes in residency or identity documents, that prevent authentication, please contact online customer service for advice.
- If camera permissions are not granted for the app, you will be unable to take photos of your identity document or perform facial recognition.
Deposit
What is a tag or meme, and why do I need to enter it when depositing crypto?
A tag or memo is a unique identifier assigned to each account for identifying a deposit and crediting the appropriate account. When depositing certain crypto, such as BNB, XEM, XLM, XRP, KAVA, ATOM, BAND, EOS, etc., you need to enter the respective tag or memo for it to be successfully credited.How to check my transaction history?
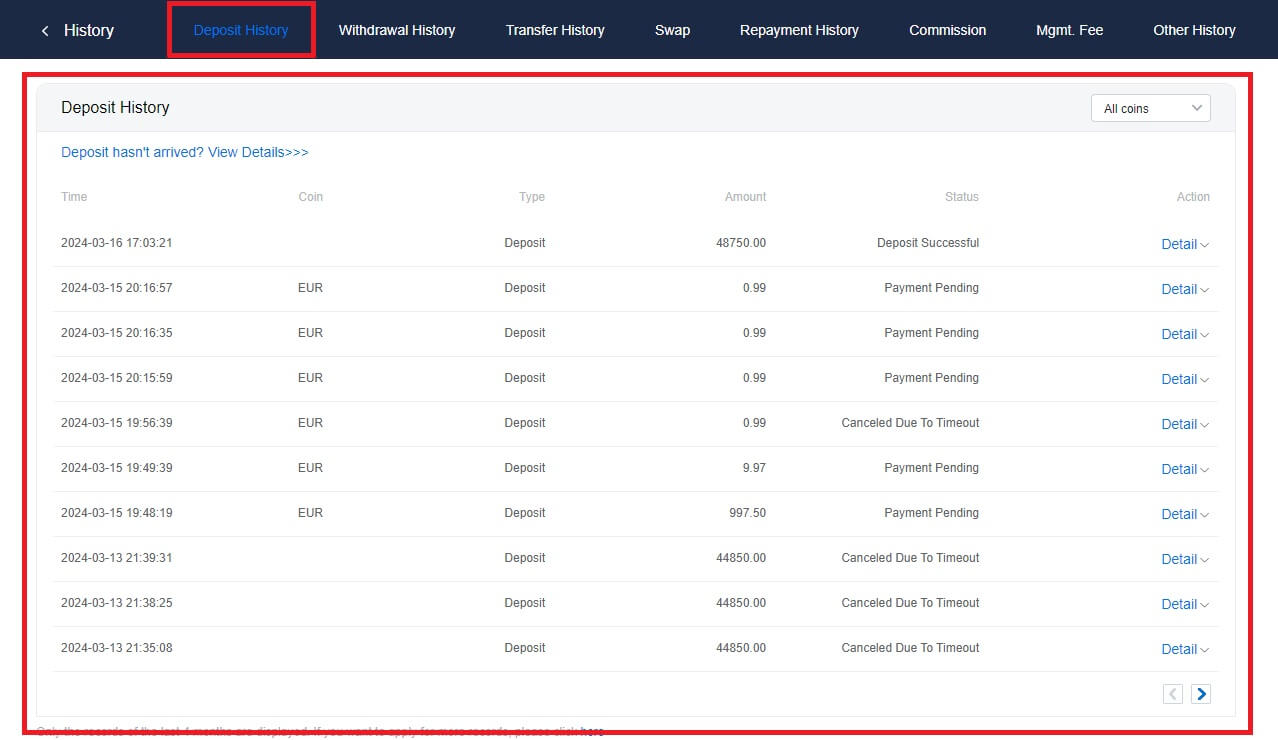
1. Log in to your HTX account and click on [Assets] and select [History].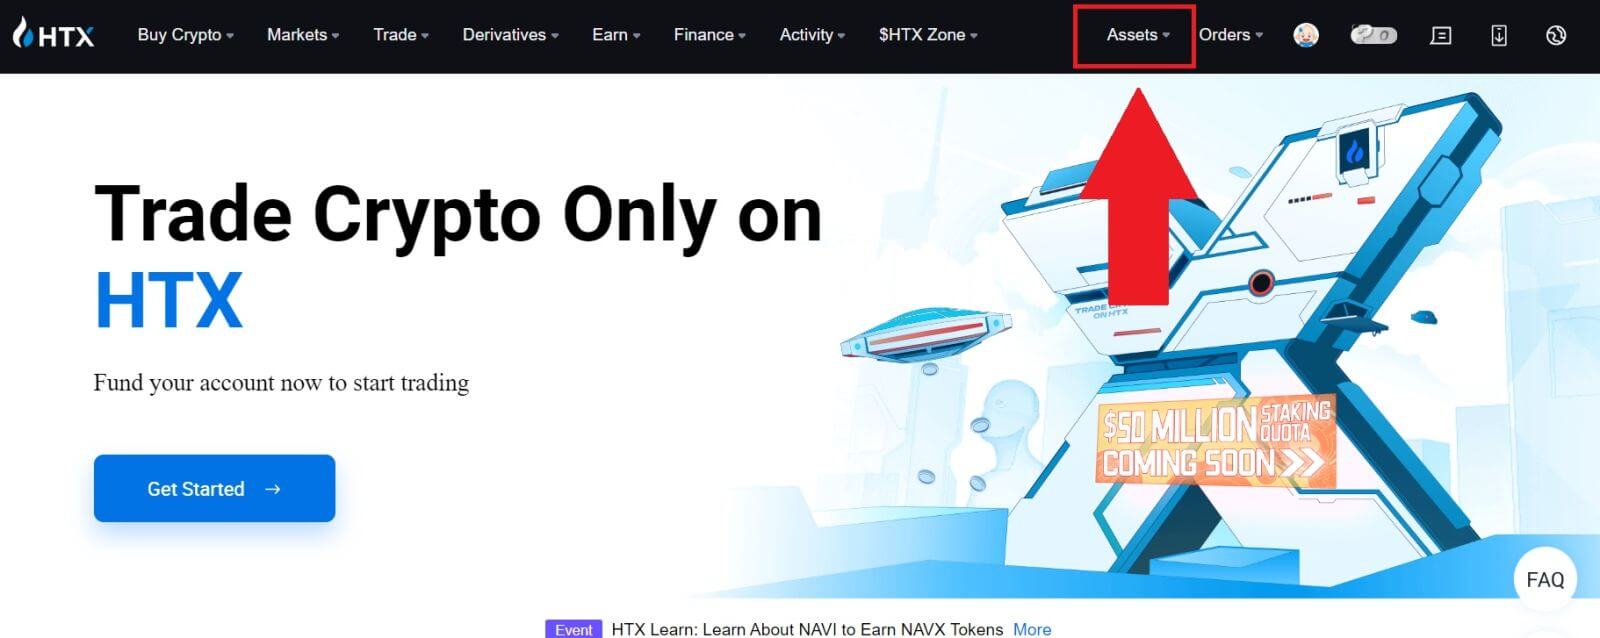

2. You can check the status of your deposit or withdrawal here.
Reasons for Uncredited Deposits
1. Insufficient number of block confirmations for a normal deposit
Under normal circumstances, each crypto requires a certain number of block confirmations before the transfer amount can be deposited into your HTX account. To check the required number of block confirmations, please go to the deposit page of the corresponding crypto.
Please ensure that the cryptocurrency you intend to deposit on the HTX platform matches the supported cryptocurrencies. Verify the full name of the crypto or its contract address to prevent any discrepancies. If inconsistencies are detected, the deposit may not be credited to your account. In such cases, submit a Wrong Deposit Recovery Application for assistance from the technical team in processing the return.
3. Depositing through an unsupported smart contract method
At present, some cryptocurrencies cannot be deposited on the HTX platform using the smart contract method. Deposits made through smart contracts will not reflect in your HTX account. As certain smart contract transfers necessitate manual processing, please promptly reach out to online customer service to submit your request for assistance.
4. Depositing to an incorrect crypto address or selecting the wrong deposit network
Ensure that you have accurately entered the deposit address and selected the correct deposit network before initiating the deposit. Failure to do so may result in the assets not being credited.
Trading
What is a Market Order?
A Market Order is an order type that is executed at the current market price. When you place a market order, you are essentially requesting to buy or sell a security or asset at the best available price in the market. The order is filled immediately at the prevailing market price, ensuring quick execution.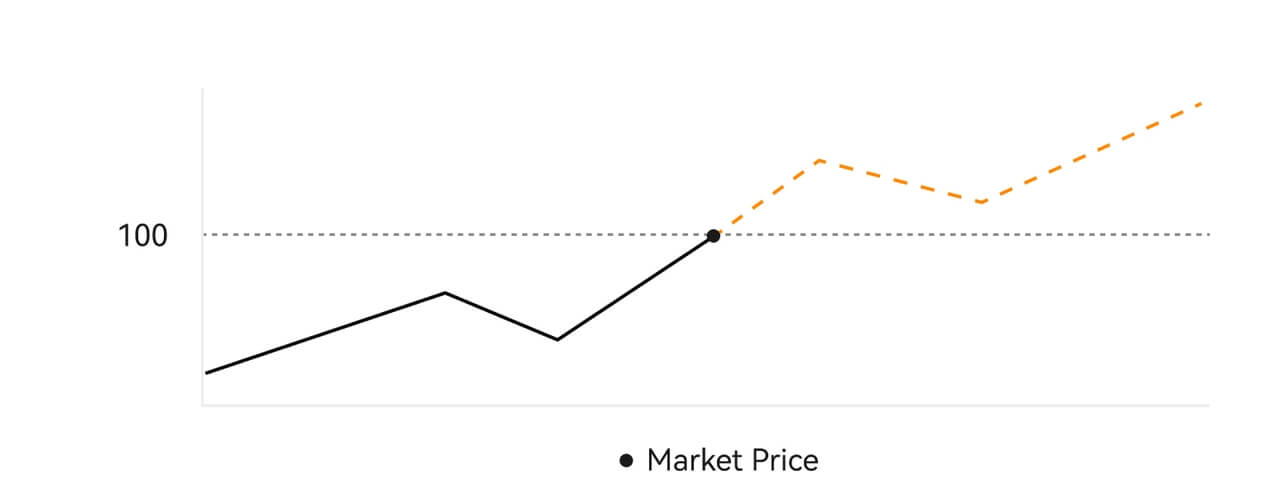 Description
If the market price is $100, a buy or sell order is filled at around $100. The amount and price that your order is filled at depend on the actual transaction.
What is a Limit Order?
A limit order is an instruction to buy or sell an asset at a specified limit price, and it is not executed immediately like a market order. Instead, the limit order is activated only if the market price reaches or exceeds the designated limit price favorably. This allows traders to target specific buying or selling prices different from the current market rate.
Limit Order illustration
When the Current Price (A) drops to the order’s Limit Price (C) or below the order will execute automatically. The order will be filled immediately if the buying price is above or equal to the current price. Therefore, the buying price of limit orders must be below the current price.
Buy Limit Order

Sell Limit Order

What is a Trigger Order?
A trigger order, alternatively termed a conditional or stop order, is a specific order type enacted only when predefined conditions or a designated trigger price are satisfied. This order allows you to establish a trigger price, and upon its attainment, the order becomes active and is dispatched to the market for execution. Subsequently, the order is transformed into either a market or limit order, carrying out the trade in accordance with the specified instructions.
For instance, you might configure a trigger order to sell a cryptocurrency like BTC if its price descends to a particular threshold. Once the BTC price hits or drops below the trigger price, the order is triggered, transforming into an active market or limit order to sell the BTC at the most favorable available price. Trigger orders serve the purpose of automating trade executions and mitigating risk by defining predetermined conditions for entering or exiting a position.
 Description
In a scenario where the market price is $100, a trigger order set with a trigger price of $110 is activated when the market price ascends to $110, subsequently becoming a corresponding market or limit order.
What is Advanced Limit Order
For limit order, there are 3 execution policies: "Maker-only (Post only)", "Fill all or cancel all (Fill or Kill)", "Fill immediately and cancel the remaining (Immediate or Cancel)"; When an execution policy is not selected, by default, a limit order will be "always valid”.
Maker-only (Post only) order will not be filled in the market immediately. If such an order is immediately filled by an existing order, such order will be cancelled to ensure that the user will always be a Maker.
An IOC order, if fails to be filled immediately in the market, the unfilled part will be cancelled immediately.
A FOK order, if fails to be fully filled, will be fully cancelled immediately.
What is Trailing Order
Trailing order refers to the strategy of sending a pre-set order into the market in the event of a large market correction. When the contract market price meets the trigger conditions and the correction ratio set by the user, such strategy will be triggered to place a limit order at the price set by the user (Optimal N price, Formula price). The main scenarios are to buy when the price hits a support level and bounces back or to sell when the price hits a resistance level and falls.
Trigger price: one of the conditions determining the trigger of the strategy. If to buy, the precondition must be: the trigger price the latest price.
Correction ratio: one of the conditions determining the trigger of the strategy. The correction ratio must be larger than 0% and no higher than 5%. The precision is to 1 decimal place of a percentage, e.g. 1.1%.
Order size: the size of a limit order after the strategy is triggered.
Order type (Optimal N prices, Formula price): the quotation type of a limit order after the strategy is triggered.
Order direction: the buy or sell direction of a limit order after the strategy is triggered.
Formula price: the price of a limit order placed in the market by multiplying the lowest price in the market with (1 + correction ratio) or the highest price in the market with (1 - correction ratio) after the trailing order is successfully triggered.
Lowest (highest) price: The lowest (highest) price in the market after the strategy is set for the user until the strategy is triggered.
Triggering conditions:
Buy orders must meet the conditions: the triggering price ≥ the minimum price, and the minimum price * (1 + correction ratio) ≤ the latest market price
Sell orders must meet the conditions: the validation price ≤ the highest price, and the highest price * (1- correction ratio)≥ the latest market price
How to View my Spot Trading Activity
You can view your spot trading activities from the Orders and Positions panel at the bottom of the trading interface. Simply switch between the tabs to check your open order status and previously executed orders.
1. Open Orders
Under the [Open Orders] tab, you can view the details of your open orders.

2. Order History
Order history displays a record of your filled and unfilled orders over a certain period.

3. Asset
Here, you can check the asset value of the coin that you are holding.

How do perpetual futures contracts work?
Let’s take a hypothetical example to understand how perpetual futures work. Assume that a trader has some BTC. When they purchase the contract, they either want this sum to increase in line with the price of BTC/USDT or move in the opposite direction when they sell the contract. Considering that each contract is worth $1, if they purchase one contract at the price of $50.50, they must pay $1 in BTC. Instead, if they sell the contract, they get $1’s worth of BTC at the price they sold it for (it still applies if they sell before they acquire).
It is important to note that the trader is purchasing contracts, not BTC or dollars. So, why should you trade crypto perpetual futures? And how can it be certain that the contract’s price will follow the BTC/USDT price?
The answer is via a funding mechanism. Users with long positions are paid the funding rate (compensated by users with short positions) when the contract price is lower than the price of BTC, giving them an incentive to purchase contracts, causing the contract price to rise and realign with the price of BTC/USDT. Similarly, users with short positions can purchase contracts to close their positions, which will likely cause the price of the contract to increase to match the price of BTC.
In contrast to this situation, the opposite occurs when the price of the contract is higher than the price of BTC - i.e., users with long positions pay users with short positions, encouraging sellers to sell the contract, which drives its price closer to the price of BTC. The difference between the contract price and the price of BTC determines how much funding rate one will receive or pay.
What are the differences between perpetual futures contracts and margin trading?
Perpetual futures contracts and margin trading are both ways for traders to increase their exposure to the cryptocurrency markets, but there are some key differences between the two.
- Timeframe: Perpetual futures contracts do not have an expiration date, while margin trading is typically done over a shorter timeframe, with traders borrowing funds to open a position for a specific period of time.
- Settlement: Perpetual futures contracts settle based on the index price of the underlying cryptocurrency, while margin trading settles based on the price of the cryptocurrency at the time the position is closed.
- Leverage: Both perpetual futures contracts and margin trading allow traders to use leverage to increase their exposure to the markets. However, perpetual futures contracts typically offer higher levels of leverage than margin trading, which can increase both potential profits and potential losses.
- Fees: Perpetual futures contracts typically have a funding fee that is paid by traders who hold their positions open for an extended period of time. Margin trading, on the other hand, typically involves paying interest on the borrowed funds.
- Collateral: Perpetual futures contracts require traders to deposit a certain amount of cryptocurrency as collateral to open a position, while margin trading requires traders to deposit funds as collateral.
Withdrawal
Why hasn’t my withdrawal arrived?
Transferring funds involves the following steps:
- Withdrawal transaction initiated by HTX.
- Confirmation of the blockchain network.
- Depositing on the corresponding platform.
Normally, a TxID (transaction ID) will be generated within 30–60 minutes, indicating that our platform has successfully completed the withdrawal operation and that the transactions are pending on the blockchain.
However, it might still take some time for a particular transaction to be confirmed by the blockchain and, later, by the corresponding platform.
Due to possible network congestion, there might be a significant delay in processing your transaction. You may use the transaction ID (TxID) to look up the status of the transfer with a blockchain explorer.
- If the blockchain explorer shows that the transaction is unconfirmed, please wait for the process to be completed.
- If the blockchain explorer shows that the transaction is already confirmed, it means that your funds have been sent out successfully from HTX, and we are unable to provide any further assistance on this matter. You will need to contact the owner or support team of the target address and seek further assistance.
Important Guidelines for Cryptocurrency Withdrawals on HTX Platform
- For crypto that support multiple chains such as USDT, please make sure to choose the corresponding network when making withdrawal requests.
- If the withdrawal crypto requires a MEMO, please make sure to copy the correct MEMO from the receiving platform and enter it accurately. Otherwise, the assets may be lost after the withdrawal.
- After entering the address, if the page indicates that the address is invalid, please check the address or contact our online customer service for further assistance.
- Withdrawal fees vary for each crypto and can be viewed after selecting the crypto on the withdrawal page.
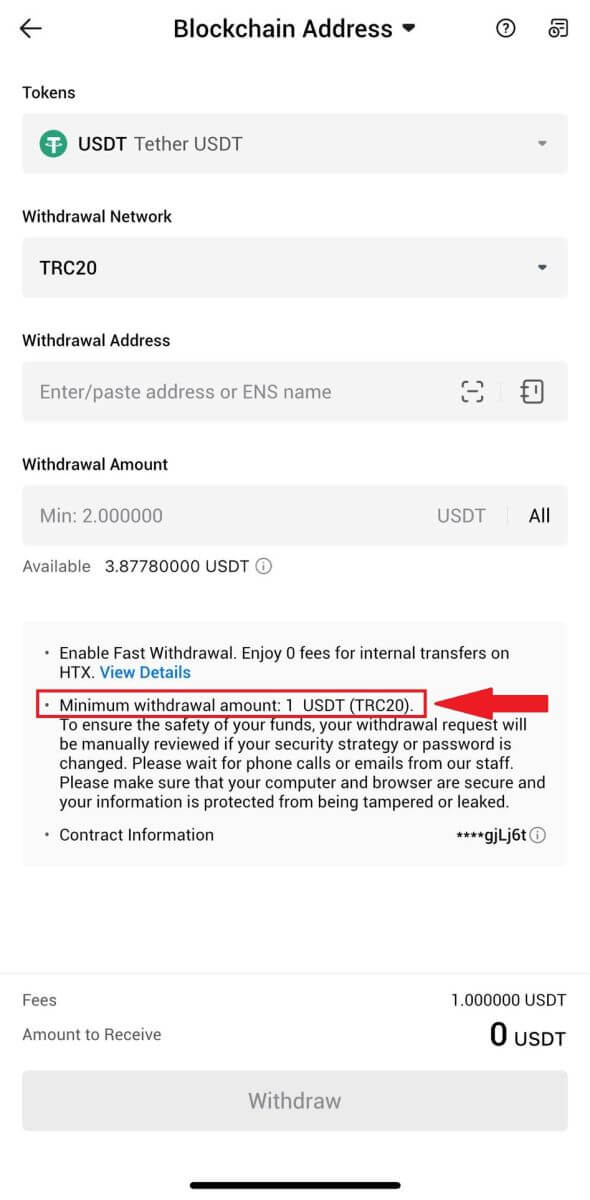
- You can see the minimum withdrawal amount and withdrawal fees for the corresponding crypto on the withdrawal page.
How do I check the transaction status on the blockchain?
1. Log in to your Gate.io, click on [Assets], and select [History].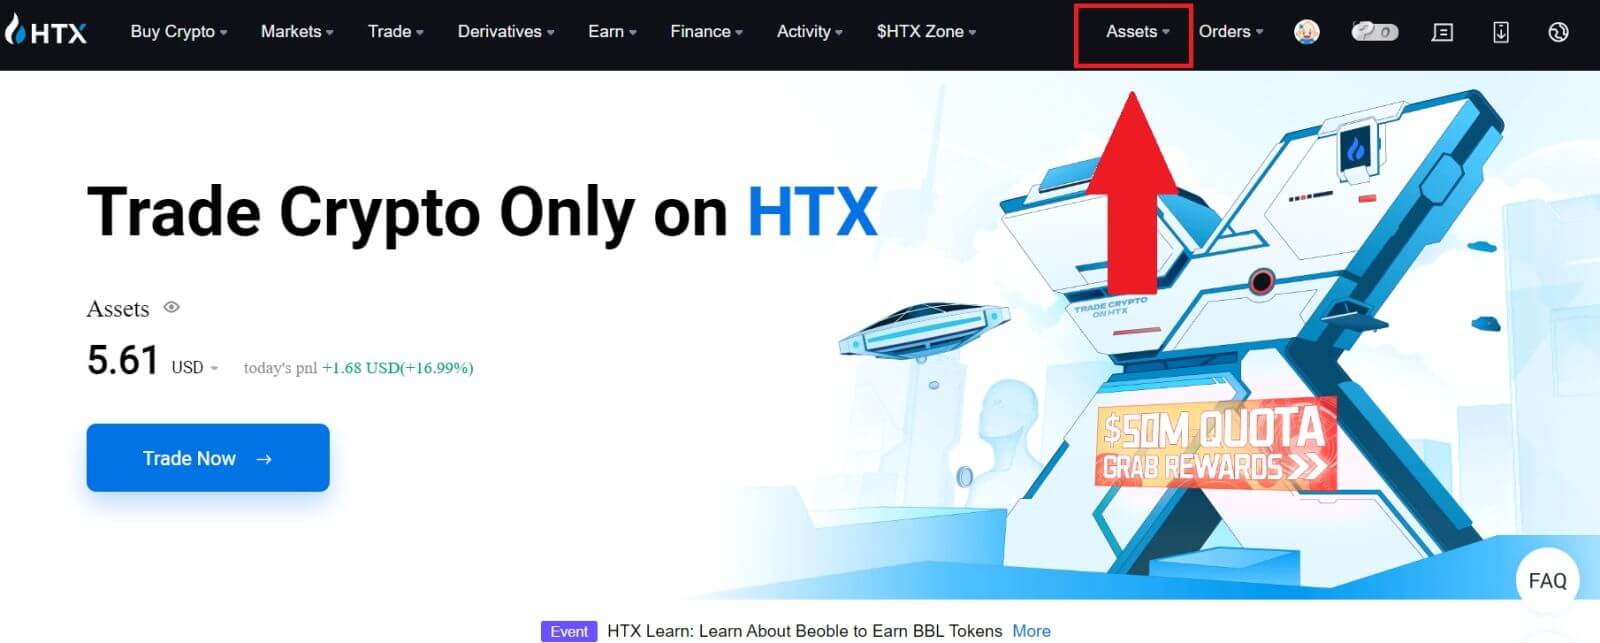

2. Here, you can view your transaction status.

Is There A Minimum Withdrawal Limit Required For Each Crypto?
Each cryptocurrency has a minimum withdrawal requirement. If the withdrawal amount falls below this minimum, it will not be processed. For HTX, please ensure that your withdrawal meets or exceeds the minimum amount specified on our Withdraw page.